Tuesday, November 30, 2021

Split Pea Soup

Living in California and driving from NorCal to SoCal down 101, I've stopped by "Andersons Pea Soup" restaurant many times. I've always enjoyed their pea soup though I haven't had it for years. Last night, my son asked his mom if she would make split pea soup. He didn't ask me? Pffft. I guess he hedged his bet on someone who made it before. I volunteered as tribute and we walked to the market to get a bag of green split peas.

The recipe I came up with was inspired by the Anderson's recipe and tailored to my desires.  You will need a way to mash the soup into a creamy delight. I used an immersion blender (OMG that was fun). You can mash it all through a screen strainer if that's your thing.

Ingredients: 

1 Package (1 lb) green split peas
2 Stalks Celery rough cut in 1-inch chunks
2 Carrots rough cut about 1/2-inch chunks 
1 Medium Onion rough cut into around 1-inch pieces
1 Medium Bay Leaf crumbled small but not powder
1 teaspoon Thyme
1/2 teaspoon Cayenne Pepper
1/4 teaspoon Kosher salt
1 teaspoon Lawry's (or your preferred brand) seasoned salt
1 quart unsalted chicken stock (substitute for water if you desire)
1 quart filtered water (or boiled and chilled, or set out overnight for chlorine to evaporate)

Optional - Chopped ham added to the finished soup

Making the soup:

Rinse the peas and remove any rocks or things that don't look like a split peas
Toss everything but the ham into the pot
Bring to a light boil then reduce to medium high rapid simmer
Rapid Simmer 20 minutes
Reduce heat and simmer for 25 minutes. Peas should be mushy. If not, check again in 5 minutes
Remove from heat and blend until smooth
Place back on heat and bring to a low simmer
Add salt and black pepper to taste
Add optional chopped ham.
Simmer until at serving temp

If you want to spice it up a little with more:
Add a little more Cayenne or Red Papper flakes
A teaspoon or two of Trader Joe's chili onion crunch
Try crumbling some Trader Joes canned fried jalapeno chilis on top

I rarely eat bread anymore but some sourdough or sweet French baguette would be great with it too.


Monday, November 15, 2021

Mac and Cheese Without The Mac

 Mac and Cheese made with cauliflower (cf) rather than carbohydrate laden macaroni. 

I imagined this dish after having gluten free pasta mac and cheese recently. Unfortunately, gluten free pasta has an many carbs as wheat flower pasts, so that doesn't help those of us who are on low carbohydrate diets for one reason or another. 

Substituting cauliflower was inspired by having a head of the stuff in the fridge. When roasted right, it has a good texture and can be a little toothy like pasta. Don't get me wrong, it isn't pasta and you will not be tricking anyone into thinking it is. That isn't the point. It is, however, a delicious dish on its own not trying to masquerade as something else.

This isn't a low-calorie dish. Sure, it has fewer calories than the pasta-based dish but is not low cal. I wouldn't call it healthy either. That's not why you eat mac and cheese or cf and cheese. The ingredients, below, give good insight to the fat in the dish.

What makes this to good? Cheese! Smoked Gouda and Sharp Cheddar. heavy cream and, of course, Bacon! I use a mildly smoked gouda that is cut from a roll and sold in 8 oz discs. My neighborhood market, Zonatto's, has a great selection of gouda packed by branded labels too.  I like the creaminess and mild smoked flavor.  Plus, it melts well for the cheese sauce. I use Tillamook Sharp Cheddar only.

This recipe does not need additional salt. There is plenty of salt in the cheese and bacon.  

Ok, onto the ingredients:

8 ounces Smoked Gouda, grated
4 ounces Sharp Cheddar, grated
16 ounces heavy whipping cream. I use 8 oz Clover and 8 oz Trader Joe's Shelf Stable. 
1 head Cauliflower
6 Slices Thick Cut Bacon
Ground Black Pepper
1-2 Tablespoons Olive Oil
Garlic Powder
Optional - Red Pepper Flakes

You will be doing the following few steps:

Much of this will be done at the same time.

  • Grate Cheese
  • Fry Bacon
  • Prepare and roast cauliflower
  • Make cheese sauce
  • Bake Casserole

Prep steps:

  • Preheat oven to 400F. I use convection with a rack in the middle.
  • Cut and prepare Cauliflower
  • Grate Cheeses

Cauliflower

Wash and dry the cauliflower. Cut in 1/4s then break by hand into small bite sized pieces. Place in a large bowl. Add 1 tablespoon olive oil and mix until cauliflower is lightly coated. I do this by hand. If you need a little more olive oil, add just enough to lightly coat.

Line a baking sheet with foil to make cleanup easier. Spread cauliflower evenly on the baking sheet. Sprinkle lightly with garlic powder and ground black pepper. 

Place cauliflower on middle rack in preheated oven and roast for 25 - 30 minutes. Test texture after 20 minutes. It should be a little firm. You don't want mushy cf and cheese.

Remove the cauliflower from the oven and let cool. I let both cool for about 30-45 minutes.


Roasted Cauliflower Cooling

Reduce oven heat to 325.

Grate Cheeses

Peel away the thin red coating off the gouda. The gouda I use has to be shaved off. I use a sharp knife but will try a vegetable peeler next time. Grate into a bowl.

Grate sharp cheddar. Set aside 2 ounces to sprinkle on top later. Put the other 2 ounces with the gouda.
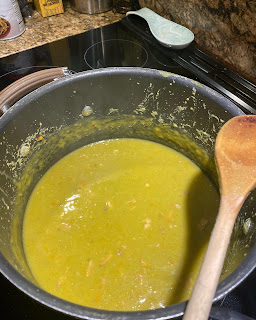
Make Cheese Sauce

In a 2-quart pot (4-quart shown), heat heavy cream until it is simmering. Add 1/4 of grated gouda and cheddar mix. Stir constantly to mix and melt. Add 1/4 more, stir, mix, melt. Add the rest, mix, melt. This takes about 10-15 minutes.  Sprinkle some ground pepper to taste or preference.  If you want a little heat, add 1/2 tsp or desired amount of red pepper flakes. Once thoroughly melted, remove from heat and let cool. You can cool to room temp. I waiting until it was mostly cool but still able to pour over the cauliflower and spoon out the rest with a silicon spoon.

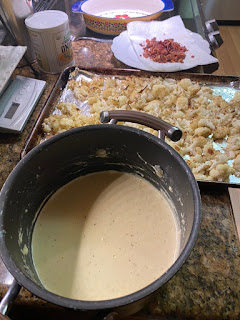
Cheese Sauce Cooling on the Assembly Line


Fry Bacon

Cook bacon to a mostly crispy texture. Move to paper towel lined plate and pat the excess oil off. Break into small pieces. I crumble by hand and leave it on the paper towel until needed.
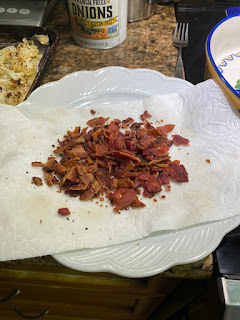
Crispy Bacon Pieces


Assemble the cf and cheese casserole:

I use a 9" oval casserole dish. 

  • Put all the cauliflower in the casserole dish.
  • Pour cheese sauce over cauliflower coating everything
  • Sprinkle bacon all over
  • Top with 2 ounces cheddar
  • I like to place the casserole disk on a baking pan in case cheese bubbles over
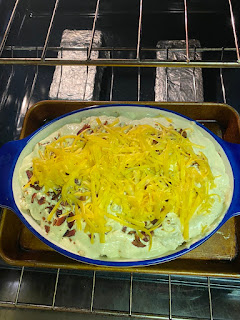
CF and Cheese Ready To Bake


Bake at 325 for 45 minutes.

Cheddar on top will brown and cheese will be bubbling.
Remove from oven and let it set 10 minutes covered with foil.

Eat!  As you can see, it was attacked before I could take a picture of the finished dish. 

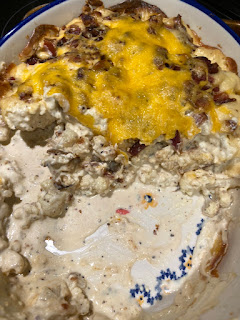
Finished - Note the Color Of The CHeddar


Bonus. We made a homemade cream of mushroom soup and added turkey meatballs and (Haricots Verts) green beans to go with the cf and cheese.  

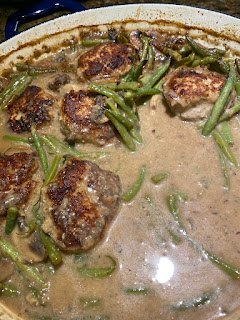
Turkey Meatballs in Mushroom Soup and Green Beans


Saturday, August 21, 2021

Homemade Beef Jerky

 I'll keep this one more brief and concise and a bunch of pictures.

Beef:  Shoot for lean and trim excess fat.  I use brisket flat, top round, top sirloin, bottom round and top blade.  I always by the last minute, it's expiring sale meats. 

Start by freezing for 30-45 minutes to make slicing easier.

Meantime, make a rub or marinade.  Search for marinade recipes and fine tune them to your flavors.  

I always use Worcestershire and Tamari and will add in other liquids that sound good.  you do not want it too wet. So, keep the volume of liquid down.  If it is wet when it comes time to  dry it, just pat it with paper towels.

This recipe is very rough measurements and makes a paste that I hand mix all the strips of beef into ensuring every slice is coated. It is more of a thick rub that sticks to the meat.

I used 1.5 lbs  Top Sirloin 

1 tablespoon Worcestershire Sauce
1 tablespoon Low Sodium Tamari because it is gluten free.  Soy Sauce is fine too
1/2 teaspoon each

  • Mustard powder
  • Cinnamon
  • Thyme
  • Italian Seasoning
1/8 teaspoon blistering hot Ghost Pepper seasoning or whatever heat source you want or leave the heat out
1 teaspoon each
  • Granulated garlic
  • Onion Power
  • Smoked Paprika
  • Dark Chili Powder or whatever you got
If not using a smoker, add 2 teaspoons of liquid smoke
Note: I do not use salt or sugar.  I don't think it needs it. It's up to you.

This is a pretty dry marinade so I don't leave marinating very long.  About 30 minutes while I get the smoker/range going and the cookie sheets lined, stuff cleaned up, etc.  If you make a more liquid marinade, refrigerate a few hours.

Start the Smoker or Dehydrator. 

I set my Traeger to Smoke setting (runs 150-160F). I preheat for 15 minutes with the lid closed (after starting).

When using my ranger with a dehydrate function, I set it at 150F. If you have a convection over and can set it as low as 150F, that should be fine.  I preheat 15 minutes.

Slice the steak, against the grain, in 1/4 inch slices. 

Mix the marinade so it is a paste and spreadable.  You are going to use your hands to get this all over the thinly sliced steak. Add small amounts of  sauces if it is too thick. 

Thoroughly mix the beef in the marinade/rub making sure everything is coated. 

Space the meat out on parchment lined backing sheets (easier cleanup) with racks.  I needed two sheets this batch.

Put it in the smoker / dehydrator. 

On the Traeger, I smoke 4 hours.
In the Range, I usually go 6 - 8 hours. 

Testing for the right dry level is kind of a science. Bend it.  It should shred a little and slowly bend itself back.  You should taste test too.

Cool to room temperature.  You can store about a week in a zip lock or couple weeks in the refrigerator. 
I strongly encourage you to get food grade desiccant packs from Amazon or where ever.  Put 10 or 15 in the container. Beef Jerky WILL MOLD.  Desiccant helps A Lot.  If it molds, toss it.

Sorry, images are out of order.  Thanks Blogger! 


Saturday, July 17, 2021

Homemade Yogurt

 My friend at Chez Bung told me how easy it is to make yogurt.  As I have yogurt every day, we buy the big containers. I decided to give it a try and was thrilled how it turned out!

I followed the Chez Bung process with some slight changes.  The first couple batches I did not use powdered milk. I still sometimes forget it. It turn out great.

At first, I drained the whey (excess watery stuff) from the finished yogurt to make it thicker and more Greek Yogurty (it's a fine word). Using powdered milk lessens the need to drain the whey but I often do anyway just to make it thicker.

There are only three steps to making yogurt. Five if you choose to drain it. It really is only two ingredients. Three if you add powdered milk. Adding powdered milk increases the yield and a very small cost.

Monday, December 7, 2020

Irish Cream Pumpkin Pie

 Irish Cream Pumpkin Pie


I am a huge fan of pumpkin pie and a do like an Irish Cream every now and then too.  Since I had my homemade Irish Cream handy, why not mix the two.  So, I did!


I was inspired by my moms pumpkin pie recipe which I think is something my mom probably got from Betty Crocker, Libby's or Better Homes and Gardens.  I think they are all pretty close.

For my recipe, I winged it a little -- as usual. After all, I don't know what I am doing.  My first pie was a bit potent which turns out was due to me mistaking my tablespoon for my teaspoon. That pie was a bit spice grainy and overly pumpkin pie spicy. This time, I made sure I used the right measuring spoon though I was a bit imprecise with the measurements.  

For the crust, we use a great quality frozen gluten free crust. You are on your own for the crust!  However, see the Extras below.

My moms pumpkin pie originally called for 1/2 cup sugar.  I think many recipes for pumpkin pie are too sweet thus I cut the sugar addition in half. the same goes for the whipped cream recipe.

My Irish Cream Pumpkin Pie Recipe

2 Eggs
1/4 cup white granulated sugar
1 teaspoon-ish ground cinnamon - rounded is good
1/2 teaspoon salt - I use Kosher salt
Using a teaspoon, measure about half teaspoon ground ginger
Using a teaspoon, measure about half teaspoon of ground clove
Using a teaspoon, measure about half teaspoon of ground allspice
8 ounces Evaporated Milk
4 ounces Irish Cream
1 can, 15 ounce, packed pumpkin

Start by preheating your oven to 425F. This takes at least 15 minutes, so plan for it.

I use an electric stand mixer thus will reference it here. My total whisking time is about 5 minutes. Use whatever mixing method you prefer. Using the whisk attachment, on low speed, whisk eggs for about 20 seconds. Add in sugar and whisk another 20 seconds. 

One at a time, sprinkle in salt, ginger, cinnamon, cloves and allspice. 

Add evaporated milk then finish with the Irish Cream. Then, add in the canned pumpkin.

Whisk all together another minute or two.

Place pie crust on a cookie sheet lined with parchment paper. Pour in filling. All the filling should fit in a standard pie crust. I suggest placing the cookie sheet and pie crust on the oven rack first to reduce the risk of spilling or dropping the whole liquidy pie.

Place pie in the center of the oven and bake at 425 for 15 minutes. 

Lower the oven temperature to 350F and continue to bake another 40 - 50 minutes.  At 40 minutes, check the center of the pie crust with a butter knife. If it comes out clean, it is done. If not, bake 5 more minutes and check again. most are done at 45 minutes.

Extras! 

Pumpkin Custard

My last baking session, I accidentally used a 29 ounce can of packed pumpkin instead of 15 ounces. That reminds me, why is one pie size 15 ounces and 2 pie size 29 ounces and not 30? Anyway, I kicked up the spices a little and added the remaining 4 ounces of evaporated milk from the 14 ounce can. Yeah, I know I didn't mentions the left over 4 ounces. I use it for coffee...

After filling the pie crust, I poured the rest into a suitable sized Pyrex baking dish and slid it into the oven along with the pie. It baked perfectly, and was fantastic. I baked for the same time as the pie and test doneness the same way. 

Both the pie and custard "crustless version" came out creamy and a bit mousse like. So delightful!


This pan measures 9x7 inches

Whipped Cream

I love to make my own whipped cream.  I start with 3/4 cup heavy whipping cream.  I add 1 tablespoon powdered sugar and about 1 teaspoon (I don't measure) Bourbon Vanilla Extract (we make our own vanilla extract with different vanilla beans and bourbons).

In my stand mixer with the whisk attachment, I whip on low then increase the speed when it doesn't splash out any longer.  I continue to whip at medium speed until it is firm and fluffy. They say "stiff peaks" but mine is more like stiff boulders. Maybe 4 minutes. Maybe 5.


Monday, November 30, 2020

Making Irish Cream

*Updated * 12/28/2020
The missus talked about making Irish Cream which peaked my interest. I did very little research (top 10 google search results for Homemade Irish Cream) and compared the recipes. They are are pretty similar so I decided to mix and match based on what I wanted. 


 What did I want? Something less sweet to start with. The store bought brands are all too sweet for my tastes. I think many great foods are ruined by being overly sweet, thus I just make my own my way! I like to taste the Whiskey in my Irish Cream but don't want it too boozy but just the right booziness. Not hot booze but more booze than cream. That's about it for my criteria. Just a couple simple things to make it the way I wanted it. Well, I also didn't want to go to the store. So, there were three I guess. 

*UPDATE:  I increased from 10 to 16oz and use Bushmills or similar.*  I had 10oz Jameson that someone left at my house. It has been here a while, so that Jameson was the whiskey I chose but there are many great Irish Whiskeys to choose from. But, don't stop there. Any whiskey will work as will bourbon. Proportions are important though. A big, strongly flavored Bourbon Whiskey might overwhelm the more fragile flavors. 

 For the cream, you can use Heavy, Whipping or Half and Half. Half and Half will definitely be thinner and unlike typical commercial brands of Irish Cream. Generally, Heavy and Whipping cream are very close to store bought commercial brands.  Different brands will have different fat amounts an Whiskey so it takes a few batches to match your favorite brand. 

My first batch, I used what I had on hand which was half and half. After that, I used heavy cream. It help balance the Whiskey and was a bit more creamy --  almost too much.  I might do it again with some half and half and some heavy cream. 

For the chocolate element. You can use chocolate syrup or cocoa powder. While chocolate syrup is easier, it adds more sugar. I used cocoa powder because I wanted to keep the sugar down and we cocoa on hand already. 

For mixing, I prefer to use a stand mixer. You can use a stand, handheld or whisk if you want. 

Note: This makes 1 liter (34 ounces) of Irish Cream. Make sure you have a bottle big enough to put it in. The typical commercial bottle is 750ML which is about 25.4 ounces.  For a 750ml batch, you need to reduce everything by 25%

*UPDATE: I've changed my recipe after 5 batches now*
My Recipe 
16 ounces Irish (Or your preferred) Whiskey 
8 ounces heavy whipping cream  
7 ounces (half a one can) condensed sweet milk 
1 teaspoon Instant Espresso (or whatever instant coffee you want) 
1 teaspoon Bourbon Vanilla Extract (or whatever vanilla extract your want. real, not imitation) 
1 teaspoon Almond Extract 
1 tablespoon Cocoa Baking Powder (We use plain old Hershey's) OR 2 tablespoons Chocolate Syrup (e.g. Hershey's) 

*UPDATE: I've updated the procedure to help minimize coffee and cocoa specks*
Making Irish Cream 
In a small sized bowl, mix 4 ounces each of whipping cream and whiskey with vanilla and almond extracts. Mix slowly.

Press cocoa through a sifter or fine mesh, while mixing the cream and whiskey mixture. Do this over 20 seconds.  this help avoid cocoa clumps or spots. 

Now press the instant coffee through the sifter while still mixing. 

Transfer to a larger bowl add the remaining whiskey and cream and mix using whatever mixer you prefer. slowly add in the sweetened condensed milk over 30 seconds. Mix until well blended. 

Mix for a couple minutes until well blended. Mine had some flakes of undissolved cocoa. That's OK.
You can taste test and adjust by adding more cream or whiskey as your taste prefer. 

Put in a suitable container / bottle and refrigerate. 

Wondering what's the ABV? 20.6% 
You can easily calculate the ABV yourself!
Let's look at at our volumes:
We have 15 ounces of milk and cream.  We have 16 ounces of whiskey that is 40% alcohol which laves us with 6.4 ounces alcohol and 9.6 ounces water. So, we have a total of 31 ounces liquid of which 6.4 ounces are alcohol. 
Thus 6.4/31*100 equal 20.6% ABV. 

 Enjoy!

Tuesday, April 21, 2020

Making Sourdough Starter

It has been years since I last made a sourdough starter. I was looking though my copy of an old Famous Mormon Recipe book and the sourdough starter recipe caught my eye. 

The recipe, printed in 1967 was updated for modern cooks and calls for active dry yeast.  In the past I just used flour and water which is what I decided to do this time.  The beauty is the simplicity.  Practically no effort

My recipe is simply 4 ounces water and 4 ounces flour. Mix and cover with plastic and secure with a  rubber band. Add the same amount daily for 5 days making sure it is bubbling a little and looks and smells like it is working. I keep mine on tope of my fridge which keeps it in the 70F temp range.

If you want to follow the Mormon Recipe book recipe. Double the flour and water and add a package of active dry yeast. Cover for a couple days in  a warm place and once it is bubbling it is ready for use.

I don't have a recipe for making Sourdough Bread yet.  I will look through old family recipes first then refer to one of the dozens of cookbooks we have.  I will skip The Internet this time.

Until then, here are some pictures of the cookbook (preserving any copyrights) and my cute little starter.


Wednesday, December 18, 2019

Rugelach Popped Into My Mind One Day

I was thinking about visiting relatives in LA the other day. part of my in-law family are Jewish.  I was introduced to a number of new delights during these visits.  Some are Greek home cooking dishes that I have a few recipe cards for and plan to make soon.  One treat I really enjoyed were Rugelach. 

Rugelach are delightful little treats that look like mini crescent rolls. Crescent rolls are delightful in their own, how could mini one in dessert for not be great?  The Rugelach I've had have been mostly chocolate or chocolate with a fruit jam or preserve. They often have coarse sugar crystals sprinkled on them.

As I thought fondly of the Rugelach, I thought I should try to make a batch. They look a bit daunting but after researching some recipes online, they seemed doable. After all, I'm Chauncey The Baker. I don't know I can't make things.

In my search for recipe ideas, and there are plenty, I narrowed it down  to a couple that seemed to fit my target: Easy and Chocolate. I wasn't thrilled with either recipe as they did something a little different or had different ingredient choices. So, I took parts from each I liked and set out to make my first batch.

I made both chocolate and one tray using a home back Quince jam over the chocolate. These came out delightful!

The dough is pretty simple. I chose to use a process that takes less than a  minute in the food processor.  Once the dough is processed, I packed it together and made four dough disks per the recipe guidelines. I wrapped each in plastic wrap and chilled in the fridge for an hour.

When I was ready to roll out the disks, I removed them from the fridge and flowered my cutting board, rolling pin and quite a bit of myself. I do not admit to the flower hand prints on a certain someone's backside.


Next, I melted two different chocolate chips. Both are dark. One had 60% cocao content and the other had 53%. I placed the bowl of chocolate in the preheated oven to melt removing every few minutes to stir.


So, now I rolled out the dough. It was around 8-10 inches. It is fine to leave them a little rough around the edges. They will be rolled up.


Now I added the chocolate leaving an inch or so around the edges.  I found I needed to work fast since the dough was a little sticky if I took too long. Some were different sizes and shapes.


Next, I took a pizza slicer and cut them into 8 pieces. I found cutting faster was better for me. I placed them on a cookie sheet and put the first (of four) batches in the freezer for 10 minutes. Since they take 20 minutes to bake, I placed the subsequent batches in the refrigerator for 20 minutes.


Before baking, I whipped an egg and brushed each Rugelach with a little egg wash. Then off to the oven for around 20 minutes. Since I can't see the color "golden brown" I needed help for the local indigent population for help. Cost me Rugelach but it was worth it!


Once they were ready, I gave them some time to cool and then shared them with the tribe before taking the rest to work, sparing the tribe from obesity and diabetes.


Saturday, November 30, 2019

How Hard Can Biscotti Be?

Flipping through my moms recipe card index, I ran across a couple Biscotti recipes. The first was Anise Toast and the second was Cappuccino Chocolate Biscotti.

I have fond memories of family snacking on Anise Toast while having coffee around the kitchen table late afternoon or evening. Many many times we would be visiting my Grandmother and she would have made Italian cookies, Anise Toast or some other baked treat.  Mostly they were on the dry side and not overly sweet. They were meant to be served with hot beverages, usually coffee but you can have them with tea if that is your thing.

My grandmother seemed to always have coffee in the afternoon. At home, my mom would always have a large pot brewing. Coffee was always on. Not particularity fancy coffee by today's standard. I still have a vintage 1962 Hills Brothers coffee tin.  The tin is adorned with coffee recipes  that were tested by the "Pan American Coffee Bureau".


I haven't made any of the recipes on the tin. Maybe someday I will and write an article about it.

Looking though the recipe cards, neither Biscotti seems too much of a challenge. I'm sure most are pretty simple and the "dough" easy to make. My Anise cookies went quite smoothly. the dough was a bit tacky but went easily into the greased baking pan.


The Cappuccino were a bit more difficult.  The dough was a bit more crumbly and took some effort mushing it into a log. I did eventually get the shape and onto the silicon mat. The dough is supposed to be dry I guess. So , I know for next time not to worry. It was the way it was supposed to be.

I baked both following the recipe then removed from the oven and sliced.  I then baked both sides of the Biscotti for 10 minutes on each side and moved to a cooling rack. As the baker, I get the pieces and crumbs that are left on the baking pan. All Mine!

Both came out great. I saved a few for my family but took the bulk to work where they were hungrily eaten by my coworkers for an office baking event.  I plated samples with Iced Italian Cookies and Sesame Thins I made.


Friday, November 29, 2019

I'm Chauncey The Baker

Kicking off this place to share pictures and stories about my adventures in cooking and baking.

Some time ago my wife said she was impressed how I have no fear about baking and cooking from scratch. I didn't really understand what that meant but soon realized that many people fear scratch cooking.

To me, scratch cooking is just cooking. Growing up in a pretty humble household, we didn't have a lot of prepared foods and rarely went out to restaurants. So infrequent were those excursions, I fondly remember our outings.

As a kind, I spent many hours clinging to my mother while she was cooking in the kitchen. I observed hundreds of dished being cooked and though she didn't bake much, I was usually right there when she did.  We pretty much made everything from scratch. I guess my lack of fear of cooking from scratch comes from that was just the way we did it. I didn't know any better. Much like Chauncey the Gardner from the movie Being There.

Fast forward many years to my wife developing her impressive cooking skills, also mostly from scratch. My confidence in scratch cooking and baking is firmly reinforced by her inspirational cooking skills. I know I can rely on her when I don't understand why something isn't right. 

Just last night when we popped the top off my Thanksgiving Chocolate Cream Pie, my wife instantly let me know my custard wasn't setup. First, what the heck is a custard? I made chocolate cream pie. Turns out the process of cooking egg yolks, sugar, milk, etc is making a custard. Well, I made one and it runeth. Tastes great but was more of a loose pudding than pie.

The recipe is simple, just sugar, flour, baking cocoa, salt, water, evaporated milk.  Just heat until thick and bubbly, take some out and wish with egg yolks then add back and stir while simmering until is it this and ready. Then pour it into the crust and let cool.

I guess I didn't simmer long enough or cooled too quickly. I'll figure it out next time or the time after. Or, maybe never.

On the other hand, my Bourbon Pecan Pie, based on a vintage recipe my mom wrote down on a recipe card 50 years ago, came out great. I am not a fan of Pecans but when I dry toasted them in a cast iron pan, WOW, they are fantastic.

The recipe is pretty easy. The vintage recipe calls for a specific molasses. I don't know enough to know that all molasses (molassi?) is not the same. I picked one from Smart and Final and used it. Turned out great. A few days later, I made one using a vintage recipe from Karo using their light syrup and it was great too. So, for Thanksgiving, I mixed the two using Molasses and Karo Syrup, added bourbon and delightfully toasted pecans.

I'll wrap up my first article letting folks know we don't have to fear the unknown, it is just unknown to us. We'll embrace the adventure and enjoy our failures and successes.